In this article, we will see how to learn Laravel 9 Import Export Excel & CSV File to Updating Database Example. This tutorial will cover on how to import and export excel or csv file data to database with example.
Steps for Laravel 9 Import Export Excel & Updating CSV File to Database Example:
Step 1: Installing fresh new Laravel 9 Application
Step 2: Creating Database and .env Configuration
Step 3: Creating Controller
Step 4: Creating Routes
Step 5: Creating Blade File
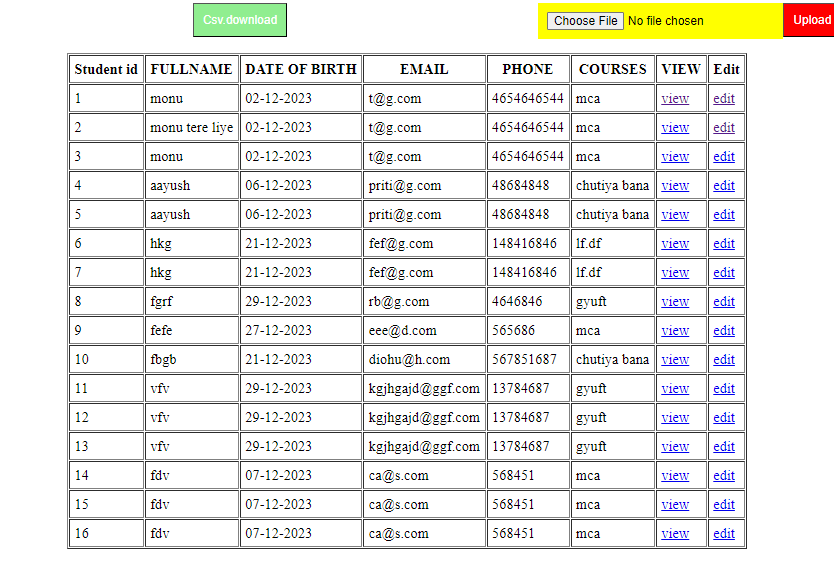
Step 6: Testing
Step 7: Conclusion
Step 1: Installing fresh new Laravel 9 Application
Firstly, we are going to install a fresh new Laravel 9 Application. To install a laravel 9 application run the following code in terminal.
Firstly, we are going to install a fresh new Laravel 9 Application. To install a laravel 9 application run the following code in terminal.
					composer create-project laravel/laravel example-app
cd example-app
Step 2:Creating Database and .env Configuration.
					<?php

use Illuminate\Database\Migrations\Migration;
use Illuminate\Database\Schema\Blueprint;
use Illuminate\Support\Facades\Schema;

return new class extends Migration
{
    /**
     * Run the migrations.
     *
     * @return void
     */
    public function up()
    {
        Schema::create('students', function (Blueprint $table) {
            $table->increments('id');
            $table->string('fullname');
            $table->string('dob');
            $table->string('email')->nullable();
            $table->string('phone')->nullable();
            $table->string('fields')->nullable();
            $table->timestamps();
        });
    }

    /**
     * Reverse the migrations.
     *
     * @return void
     */
    public function down()
    {
        Schema::dropIfExists('students');
    }
};
Step 3:Creating Controller setup.
php artisan make:controller StudentsController
Step 4:Creating routes setup.
					Route::get('/students/a',[StudentController::class,'index']);
Route::get('/students/download',[StudentController::class,'download']);
Route::post('/students/updateCSV',[StudentController::class,'updateCSV']);
Step 5:Creating index setup.
					<div style="width: 1000px; margin:0 auto;">

    <div style="display: flex; justify-content:space-around">
        <div>
            <a href="/students/download">
                <button type="button" style="background-color: lightgreen; padding:10px; color:white">Csv.download</button>
            </a>
        </div>
        <div>
            <form action="/students/updateCSV" method="POST" enctype="multipart/form-data">
                @csrf
                <div style="display: flex; justify-content:space-evenly">
                    <div>
                        <input type="file" name="student_update" style="background-color: yellow; padding:10px; color:black" />
                    </div>
                    <div>
                        <button style="background-color: red; padding:10px; color:white" type="submit">Upload</button>
                    </div>
                </div>
            </form>
        </div>
    </div>

    <table border="1" cellpadding="5">
        <tr>`
            <th>Student id</th>
            <th>FULLNAME</th>
            <th>DATE OF BIRTH</th>
            <th>EMAIL</th>
            <th>PHONE</th>
            <th>COURSES</th>
            <th>VIEW</th>
            <th>Edit</th>
        </tr>
        @foreach($students as $i => $stud )
        <tr>
            <td>{{$stud -> id}}</td>
            <td>{{$stud -> fullname}}</td>
            <td>{{$stud -> dob}}</td>
            <td>{{$stud -> email}}</td>
            <td>{{$stud -> phone}}</td>
            <td>{{$stud -> fields}}</td>
            <td><a href="/students/{{$stud -> id}}/show ">view</a></td>
            <td><a href="/students/{{$stud -> id}}/edit ">edit</a></td>

        </tr>
        @endforeach
    </table>
</div>
Step 6:Creating download setup.
1.in the anchor add the route that we have created above.
2.to download the data from database add this code.
					<div style="width: 1000px; margin:0 auto;">

    <div style="display: flex; justify-content:space-around">
        <div>
            <a href="/students/download">
                <button type="button" style="background-color: lightgreen; padding:10px; color:white">Csv.download</button>
            </a>
        </div>

    </div>

</div>
Step 7:Creating update setup.
1.Now make changes in the csv that you have downloaded.
2.Now in form action add the route.
3.code shown below.
					  <form action="/students/updateCSV" method="POST" enctype="multipart/form-data">
                @csrf
                <div style="display: flex; justify-content:space-evenly">
                    <div>
                        <input type="file" name="student_update" style="background-color: yellow; padding:10px; color:black" />
                    </div>
                    <div>
                        <button style="background-color: red; padding:10px; color:white" type="submit">Upload</button>
                    </div>
                </div>
            </form>
Step 8:Creating controller Download setup.
1.Controller setup for downloading the data from database.
					public function download(){
    // Retrieve all student records from the database using the Student model
    $students = Student::get();

    // Define the column headers for the CSV file
    $row = [
        '0' => 'SRNO',
        '1' => 'StudentId',
        '2' => 'Full Name',
        '3' => 'date of birth',
        '4' => 'email address',
        '5' => 'phone number',
        '6' => 'course name',
    ];

    // Combine the column headers into a CSV string
    $csv = implode(',', $row);

    // Iterate through each student record and append their information to the CSV string
    foreach ($students as $key => $stud) {
        $row =[];
        array_push($row, $stud['id']);
        array_push($row, $stud['fullname']);
        array_push($row, $stud['dob']);
        array_push($row, $stud['email']);
        array_push($row, $stud['phone']);
        array_push($row, $stud['fields']);

        // Append the current student's information to the CSV string
        $csv .= '
        ' . ($key + 1) . ',' . implode(',', $row);
    }

    // Generate a filename for the CSV file based on the current date and time
    $filename = "student_" . date("d-m-Y H i") . ".csv";

    // Set HTTP headers to indicate that the response is a CSV file and trigger download
    header('Content-type: application/csv');
    header('Content-Disposition: attachment; filename=' . $filename);

    // Output the CSV string to the browser, initiating the download
    echo $csv;
}
Step 9:Creating controller update setup.
1.Controller setup for Upadting the data in database.
					public function updateCSV(Request $request)
{
    // Retrieve the uploaded CSV file from the request
    $filename = $request->file('student_update');

    // Check if a valid CSV file is uploaded
    if ($filename && strtolower($filename->getClientOriginalExtension()) == 'csv') {
        // Open the CSV file for reading
        $fh = fopen($filename, 'r');

        // Read the header row from the CSV file
        $header = fgetcsv($fh);

        // Define the expected header for the CSV file
        $expectedHeader = ['SRNO', 'StudentId', 'Full Name', 'date of birth', 'email address', 'phone number', 'course name'];

        // Compare the header from the CSV file with the expected header
        if ($header !== $expectedHeader) {
            fclose($fh);
            return back()->withErrors(['Invalid CSV file.']);
        }

        // Process each row of data in the CSV file
        while ($data = fgetcsv($fh)) {
            // Retrieve the student record from the database based on the StudentId
            $student = Student::where('id', $data[1])->first();

            // Check if the student record exists
            if ($student) {
                // Define the update array with data from the CSV file
                $update = [
                    'fullname' => $data[2],
                    'dob' => $data[3],
                    'email' => $data[4],
                    'phone' => $data[5],
                    'fields' => $data[6],
                ];

                // Update the student record with the new data
                $student->update($update);
            }
        }

        // Close the CSV file
        fclose($fh);

        // Redirect back with a success message
        return back()->with('success', 'CSV file successfully processed.');
    } else {
        // Redirect back with an error message if the file format is not valid
        return back()->withErrors(['Invalid file format. Please upload a CSV file.']);
    }
}
Step 10:conclusion.
You can see the crystal clear difference of code clarity.
You can see the crystal clear difference of code clarity.